Bash command pipe
dmesg | grep maps | grep -oE “\[[0-9]+\]” | grep -oE “[0-9]+” | while read x ; do cat /proc/$x/cmdline ; echo; cat /proc/$x/maps | grep tmp; done
Easy way to unpack Confuserex 1.0 Max Settings
Hi, I decided to write this tutorial because of a request. This time, we won’t use windbg, or any other debugger. I’ll make another tutorial for this approach.
So Target : http://ge.tt/7b0Shli2
First, we have to decrypt the methods. Go to module -> .cctor and place a breakpoint just after the first call :
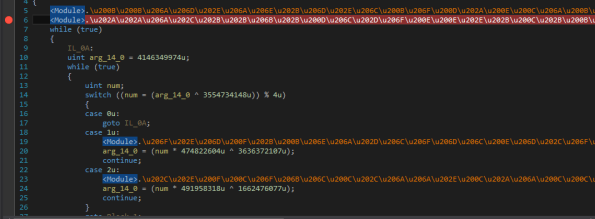
Debug the exe and open module (Ctrl + Alt + u) :
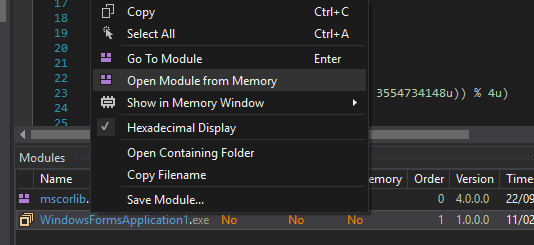
Go again in module -> .cctor and nop the two first calls :
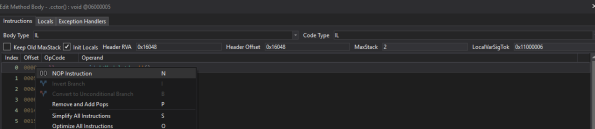
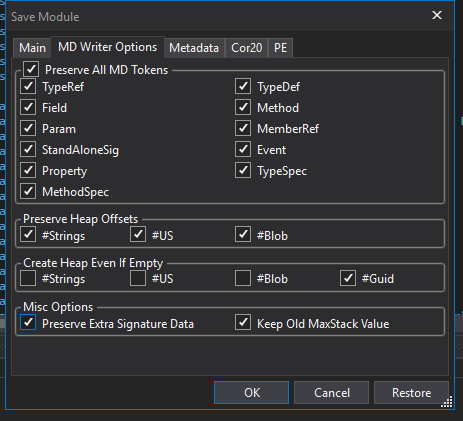
Methods are now decrypted. We had to remove this call because this call will decrypt the methods and methods are decrypted. Now save the module using this options :
Now we have to remove the Packer. For that, we need dnSpy debugger. Go to the entry point and scroll to the bottom. Place a breakpoint on GCHandle.Free();
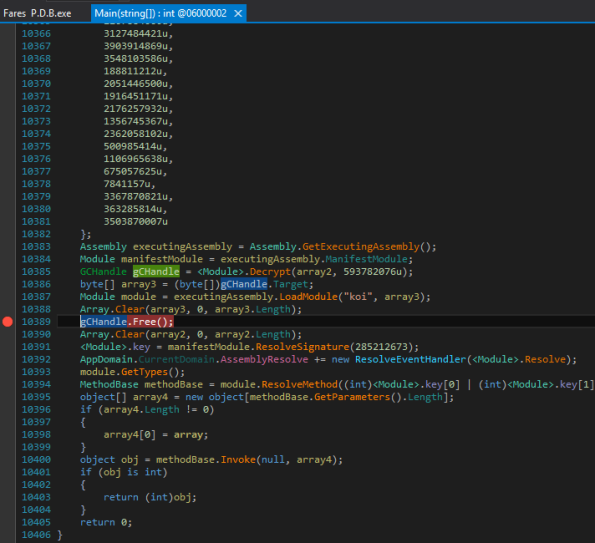
Then start the debug and wait for the breakpoint. When it hit, open modules (Ctrl…
View original post 203 more words
CURLOPT_PINNEDPUBLICKEY
Source: CURLOPT_PINNEDPUBLICKEY
How To Secure Apache with Let’s Encrypt on Ubuntu 16.04 | DigitalOcean
This tutorial will show you how to set up a free TLS/SSL certificate from Let’s Encrypt on a Ubuntu 16.04 server running Apache as web server. TLS certificates are used within web servers to encrypt the traffic between server and client, providing ext
Source: How To Secure Apache with Let’s Encrypt on Ubuntu 16.04 | DigitalOcean
Validating JavaScript code with JSDoc types annotations | WebStorm & PhpStorm Blog
Srool The Knife: Debugging Android HTTP traffic with Charles Proxy and Genymotion emulator
Debugging Android HTTP traffic with Charles Proxy and Genymotion emulator Genymotion (http://www.genymotion.com/) is a great tool for debugging your Android code. It is much faster than the Android emulator as it is based on x-86 native code, and unless you really do some low level work, is indistinguishable from a real device. It actually is faster and smoother than most devices, so make sure you also test on real devices… Anyway, it became an important tool for me while developing. Highly recommended! Occasionally you need to debug HTTP calls (to web sites, or more often to server API end points), and for that an HTTP proxy as Charles (http://www.charlesproxy.com/) is another great tool. Its paid version already returned its cost 10 fold for me… So, first you will need to setup charles on your Mac as the proxy for the emulated Android machine. The key is to know the local mac IP is 10.0.3.2 and the default port for the proxy is 8888 (if you have not played with Charles settings). Detailed instructions for setting the proxy on the Android virtual machine in Genymotion are available here: http://rexstjohn.com/using-genymotion-charles-proxy/: And repeated for your convenience In your Genymotion Android emulator… Settings -> Wifi -> Press and hold your active network Select “Modify Network” Select “Show Advanced Options” Select “Proxy Settings -> Manual” Set your Proxy to: 10.0.3.2 (Genymotion’s special code for the local workstation) Set your Port to: 8888 Press Save Now, this worked fine as long as I was using unencrypted http, but if you need to work with SSL encrypted APIs and need to get the clear data to debug your stuff, you can set Charles to provide the SSL certificate. To do that you need to follow these instructions (the instructions are available here: http://stackoverflow.com/questions/3976728/how-to-configure-ssl-certificates-with-charles-web-proxy-and-the-latest-android between the “brakertech” answer and “bkurzius: answer): Install fully licensed charles version In Charles, goto Proxy -> Proxy Settings -> check “Enable Transparent HTTP Proxying” Proxy -> Proxy Settings -> SSL TAB -> check “enable SSL Proxying” Add your host to the list of Locations (e.g. http://www.secure.com) with port 443 Download the Charles certificate here: http://www.charlesproxy.com/documentation/using-charles/ssl-certificates/ unzip the certificate, and then send it by email to your emulated device (or make it available for download from the emulated device browser). When you get it on the device and open it, you will be able to install it by giving it a name. Depending on the Android OS version, you may need to first set a screen lock PIN or password Once the certificate is installed, you can intercept encrypted SSL traffic using Charles.
Source: Srool The Knife: Debugging Android HTTP traffic with Charles Proxy and Genymotion emulator
VirtualBox Network Interface not shown in WireShark
This is Windows problem that doesn’t propagate and advertise new virtual interfaces once created. The solution is to restart the Windows Service called ‘NetGroup Packet Filter Driver’.
C:\Windows\system32>net stop npf

The NetGroup Packet Filter Driver service was stopped successfully.

C:\Windows\system32>net start npf

The NetGroup Packet Filter Driver service was started successfully.
Source: The Systems Engineer organized chaos: GNS3 doesn’t list new VirtualBox Network Devices
Move bootstrap carousel indicator outside the main div
jQuery(function($) {
	$('#carousel-review').on('slide.bs.carousel', function () {
		$holder = $( ".carouse-clone ol li.active" );
		$holder.next( "li" ).addClass("active");
		if($holder.is(':last-child'))
		{
			$holder.removeClass("active");
			$(".carouse-clone ol li:first").addClass("active");
		}
		$holder.removeClass("active");
	});
});
Đồng bộ database (mysql) giữa các lập trình viên trong nhóm (wordpress) với git
Trong lập trình web, để đồng bộ database giữa các pc của lập trình viên nhiều khi phải thực hiện thủ công, export và import khá mất thời gian và không đồng bộ. Đôi lúc chúng ta mong muốn việc đồng bộ database được thực hiện giống như đồng bộ source code. Việc này có thể thực hiện bằng sử dụng các hooks của git, cụ thể là pre-commit và post-merge.
Các hooks nằm ở:
/path/to/your/repo/.git/hooks
Đầu tiên, thực hiện việc export database bằng pre-commit, chỉnh sửa (hoặc thêm) file pre-commit với nội dung:
#!/bin/bash
mysqldump -u [mysql user] -p[mysql password] --skip-extended-insert [database] > /path/to/your/repo/[database].sql
cd /path/to/your/repo
git add [database].sql
Và cuối cùng add thêm hook post-merge để import database vào
#!/bin/bash
mysql -u [mysql user] -p[mysql password] [database] < /path/to/your/repo/[database].sql
Ví dụ (nhớ đổi đuôi file): hooks.7z
Tham khảo: http://ben.kulbertis.org/2011/10/synchronizing-a-mysql-database-with-git-and-git-hooks/
